Tip: Start typing in the input box for immediate search results.
-
Feature
-
Interface
-
File Operation
-
Design Central
-
Basic Setting
-
Viewing Tools
-
Object Operation
-
Drawing
-
Parametric
-
Graph Editing
-
Graph Transform
- Move
- rotate
- Transform Again
- Mirror
- Arc and Line Fit
- Envelop Distortion
- Perspective Distortion
- Push and Pull Distortion
- Twist Distortion
- Shadow Distortion
- Curve Zmap
- Auto Nesting
- Interactive Nesting
- Clone Along a Curve
- Rectangular Clone&Polar Clone
- Clone along a Line
- Clone along an Arc
- Clone along a Spiral
- Scale 2 Points
- Orient 2 lines
- 3D Move
- 3D Rotate
- 3D Scale
- 3D To XY Plane
-
Image Processing
-
Text Editing
-
Node Editing
-
Graph Toolpath
- Tool Path
- Profile Machining
- Area Clearance
- Flute Machining
- 3D Corner Engraving
- Midine Machining
- Drilling
- Insert And Inlay
- Intelligent Machining
- Prism Machining
- Embossing Machining
- Toolpath output
- Tool Management
- Toolpath Walk Simulation
- Toolpath Shaded Simulation
- Post Set
- Toolpath Regenerate
- Toolpath Stat
- Chamfer Machining
- Adaptive Area Clearance
-
Image Toolpath
-
Wireframe Toolpath
-
Toolpath Edit
-
Waveboard
-
Mesh
-
Relief Sculpt
-
Surface
- Surface
- Import Surface File
- Standard Surface
- Freeform Surface
- Chamfer Surface
- Fillet Surface
- Extend Surface
- Show Effect
- To 3D Curve
- Curve Project to Surface
- Pullback
- Extract Edge
- Split at Isocurve
- Trim at Curve
- Trim at Surface
- Untrim
- To Mesh
- Edit Node of Surface
- Insert Control Point
- Vari Fillet Surfaces
- 3D-Spline
- Surface Flatten
- Mesh Wrap
-
Canvas 3D
-
Surface Toolpath
Scale 2 Points
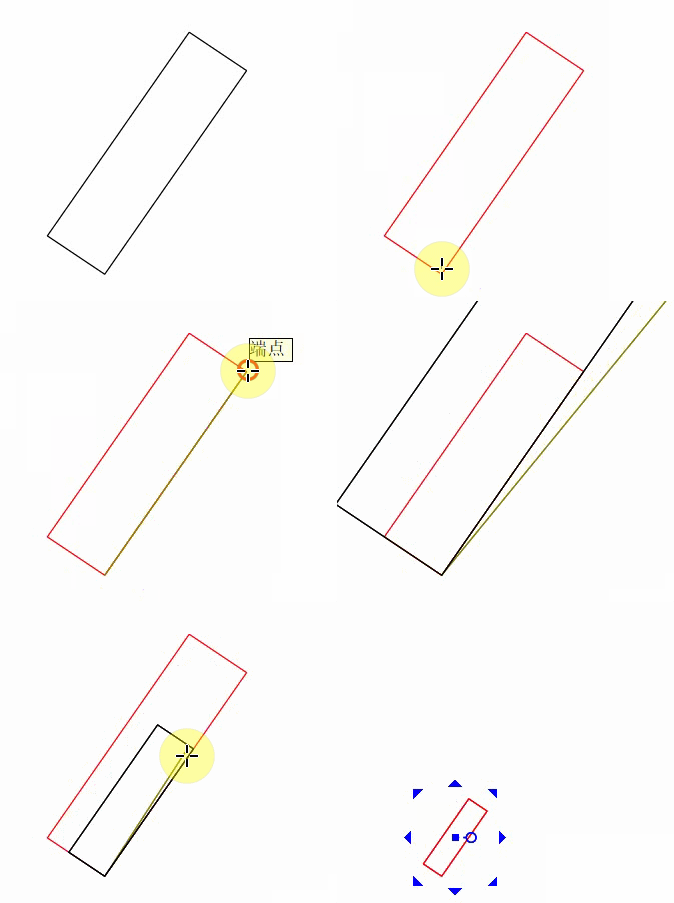
scale along with the line.
Step:
1.slect the objects.(2D or 3D objects)
2.pick the base point.
3.pick the reference point1.
4.pick the reference point2.
link the base point and the reference point1 , to create the direction line.
when the reference point2 is outside of the direction line, magnify the objects.
when the reference point2 is inside of the direction line, shrink the objects.

Note:Press “Shift”key, copy the objects when scale.
Press “Ctrl”Key, no change int Y axis when scale.
Press“Alt”Key, no change int Z axis when scale.
